
|
 Home Home
 Projects Projects
 Experiments Experiments
 Circuits Circuits
 Theory Theory
 BLOG BLOG
 PIC Tutorials PIC Tutorials
 Time for Science Time for Science
|
| ||
|
Creating new files and adding them in the project First of all, we need to prepare the project directory a little bit. Microchip has create and distributes together with the MPLAB IDE, some header files that will make your life easier when programming with assembly. Those files will give a name to the numerous hexadecimal positions of the memory of the PIC. To give you an example on the degree of ease that this file provides, i will show you an example: movlw b'00100000' and... movlw b'00100000' The two code blocks above will do exactly the same job. The second one uses the name PORTA instead of the hexadecimal memory position of the PORT-A of the PIC. Which one is easier to read? And imagine that there are tens of such memory positions! This header file is located within the MPLAB IDE directory, under the subdirectory 'devices'. Instead, you can directly download it from our following link:
Adding the Microchip PIC16F88 header file in your progect 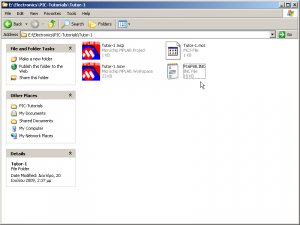 There are two ways to begin. Either you will copy this file inside your project directory, or you will link to it from the directory that originally exists. I prefer the first way. I always want to have all project files inside one directory. There are some files of course that should be placed in a common directory and held there. For this one, you can do as you wish. Just make sure that if you happen to change your computer configuration, if you keep the file at the original position, then this files should be located in the same position as before. 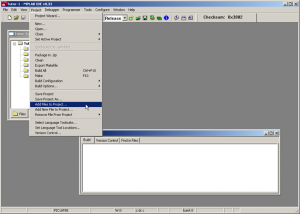 Then you go to the menu Project -> Add files to project 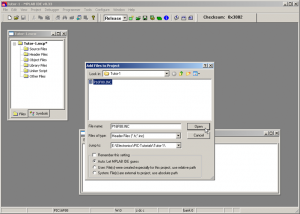 A file browser appears. Make sure that you have chosen 'Files of type' to be 'Header *.h, *.inc'. Go to your project directory (or wherever else the PIC16f88.inc file is located) and open it. 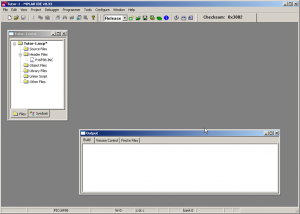 When you click 'Open', the project explorer should have the header file located under the 'Header Files' node. You should note that right now, the file is loaded in the project but will not take part in the compilation of the program at all. This means that the file is only shown there, but does absolutely nothing. Each and every file MUST be included using the #include command to take part in the compilation. We will refer to this command in the following pages. You should not confuse this procedure with the previous one. Adding files and adding new files are two different meus. The first one will add existing files to the project explorer. The second one that will be demonstrated right now, will create a new file and will add it to the project explorer as well. 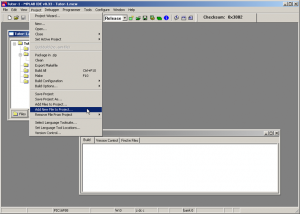 Go to the menu Project -> Add New File to Project 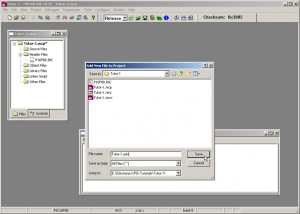 The file browser will appear. Make sure that you are in your project's directory. In the 'File Name' textbox, write the name of the new file that you wish to create and add. IMPORTANT! You should include also the extension of the file!!! During our tutorials, you should need to know two extensions: the .asm that represents an assembly listing file, and the .inc that represents a header file. Right now we need an assembly file to be created. I have used the name 'Tutor-1.asm'. You should use the same for following this tutorial. 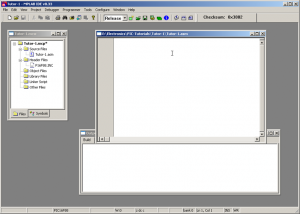 When you click 'Save', two things will happen: First, a new file shall be created with the filename given before. Second, this file will be loaded in the project and will be shown in the project explorer window. If you did everything correct, then you should have the 'Tutor-1.asm' shown under the 'Source Files' tree node. Also, the file will be opened for editing. It will be of course blank. Confirm your knowledge There is an online test to check your knowledge on this page. You may reveal the test with the following button: Comments
No part of this publication may be reproduced, stored in a retrieval system or transmitted in any form or by any means, electronic, mechanical, photocopying, recording, scanning or otherwise without the prior written permission of the author. Read the Disclaimer
All trademarks used are properties of their respective owners.
Copyright © 2007-2009 Lazaridis Giorgos. All rights reserved. |
  
|
 Contact Contact
 Forum
Projects
Experiments
Circuits
Theory
BLOG
PIC Tutorials
Time for Science Forum
Projects
Experiments
Circuits
Theory
BLOG
PIC Tutorials
Time for Science
 RSS RSS
Site design: Giorgos Lazaridis © Copyright 2008 Please read the Terms of services and the Privacy policy |
 PIC16f88 Microchip header file


